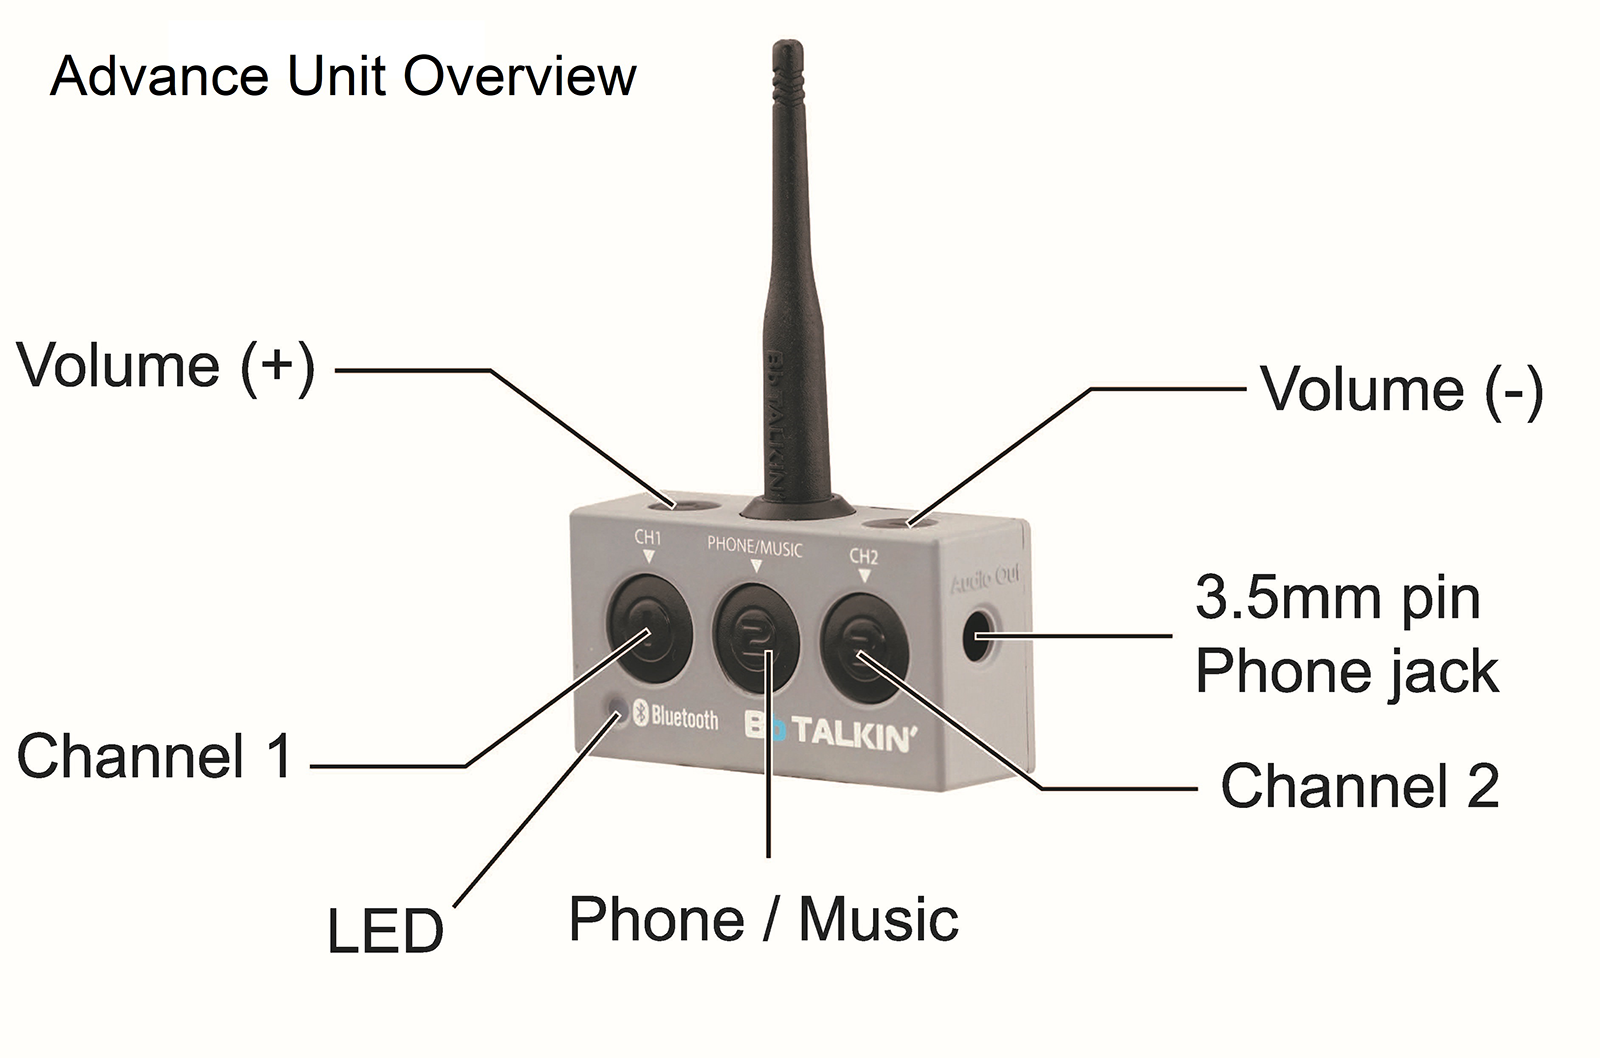
CHARGING:
Cable: Micro USB
AC Adapter less than 5V. *Do not use higher than 5V or this will damage the IC unit and void warranty.
Please make sure the device is completely dry before charging.
BATTERY
Battery life – in use: 14 hours
Charge time: 2.4 hours
Charging: AC Adapter less than 5V
LED while charging:
Red = Advance Unit is charging
Blue = Advance Unit fully charged
LED while on:
Blue = Battery life 100%-60%
Purple = Battery life 60%-40%
Red = Battery low
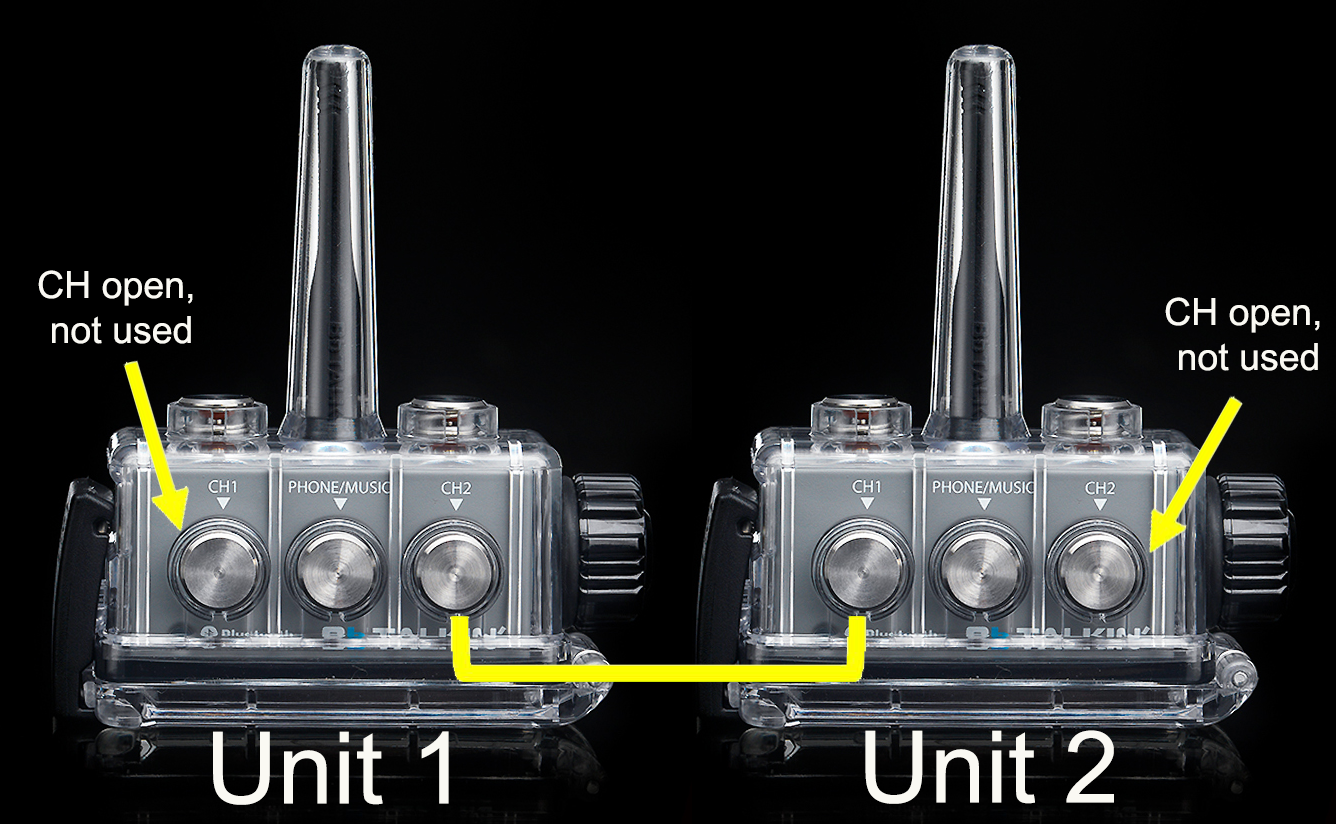
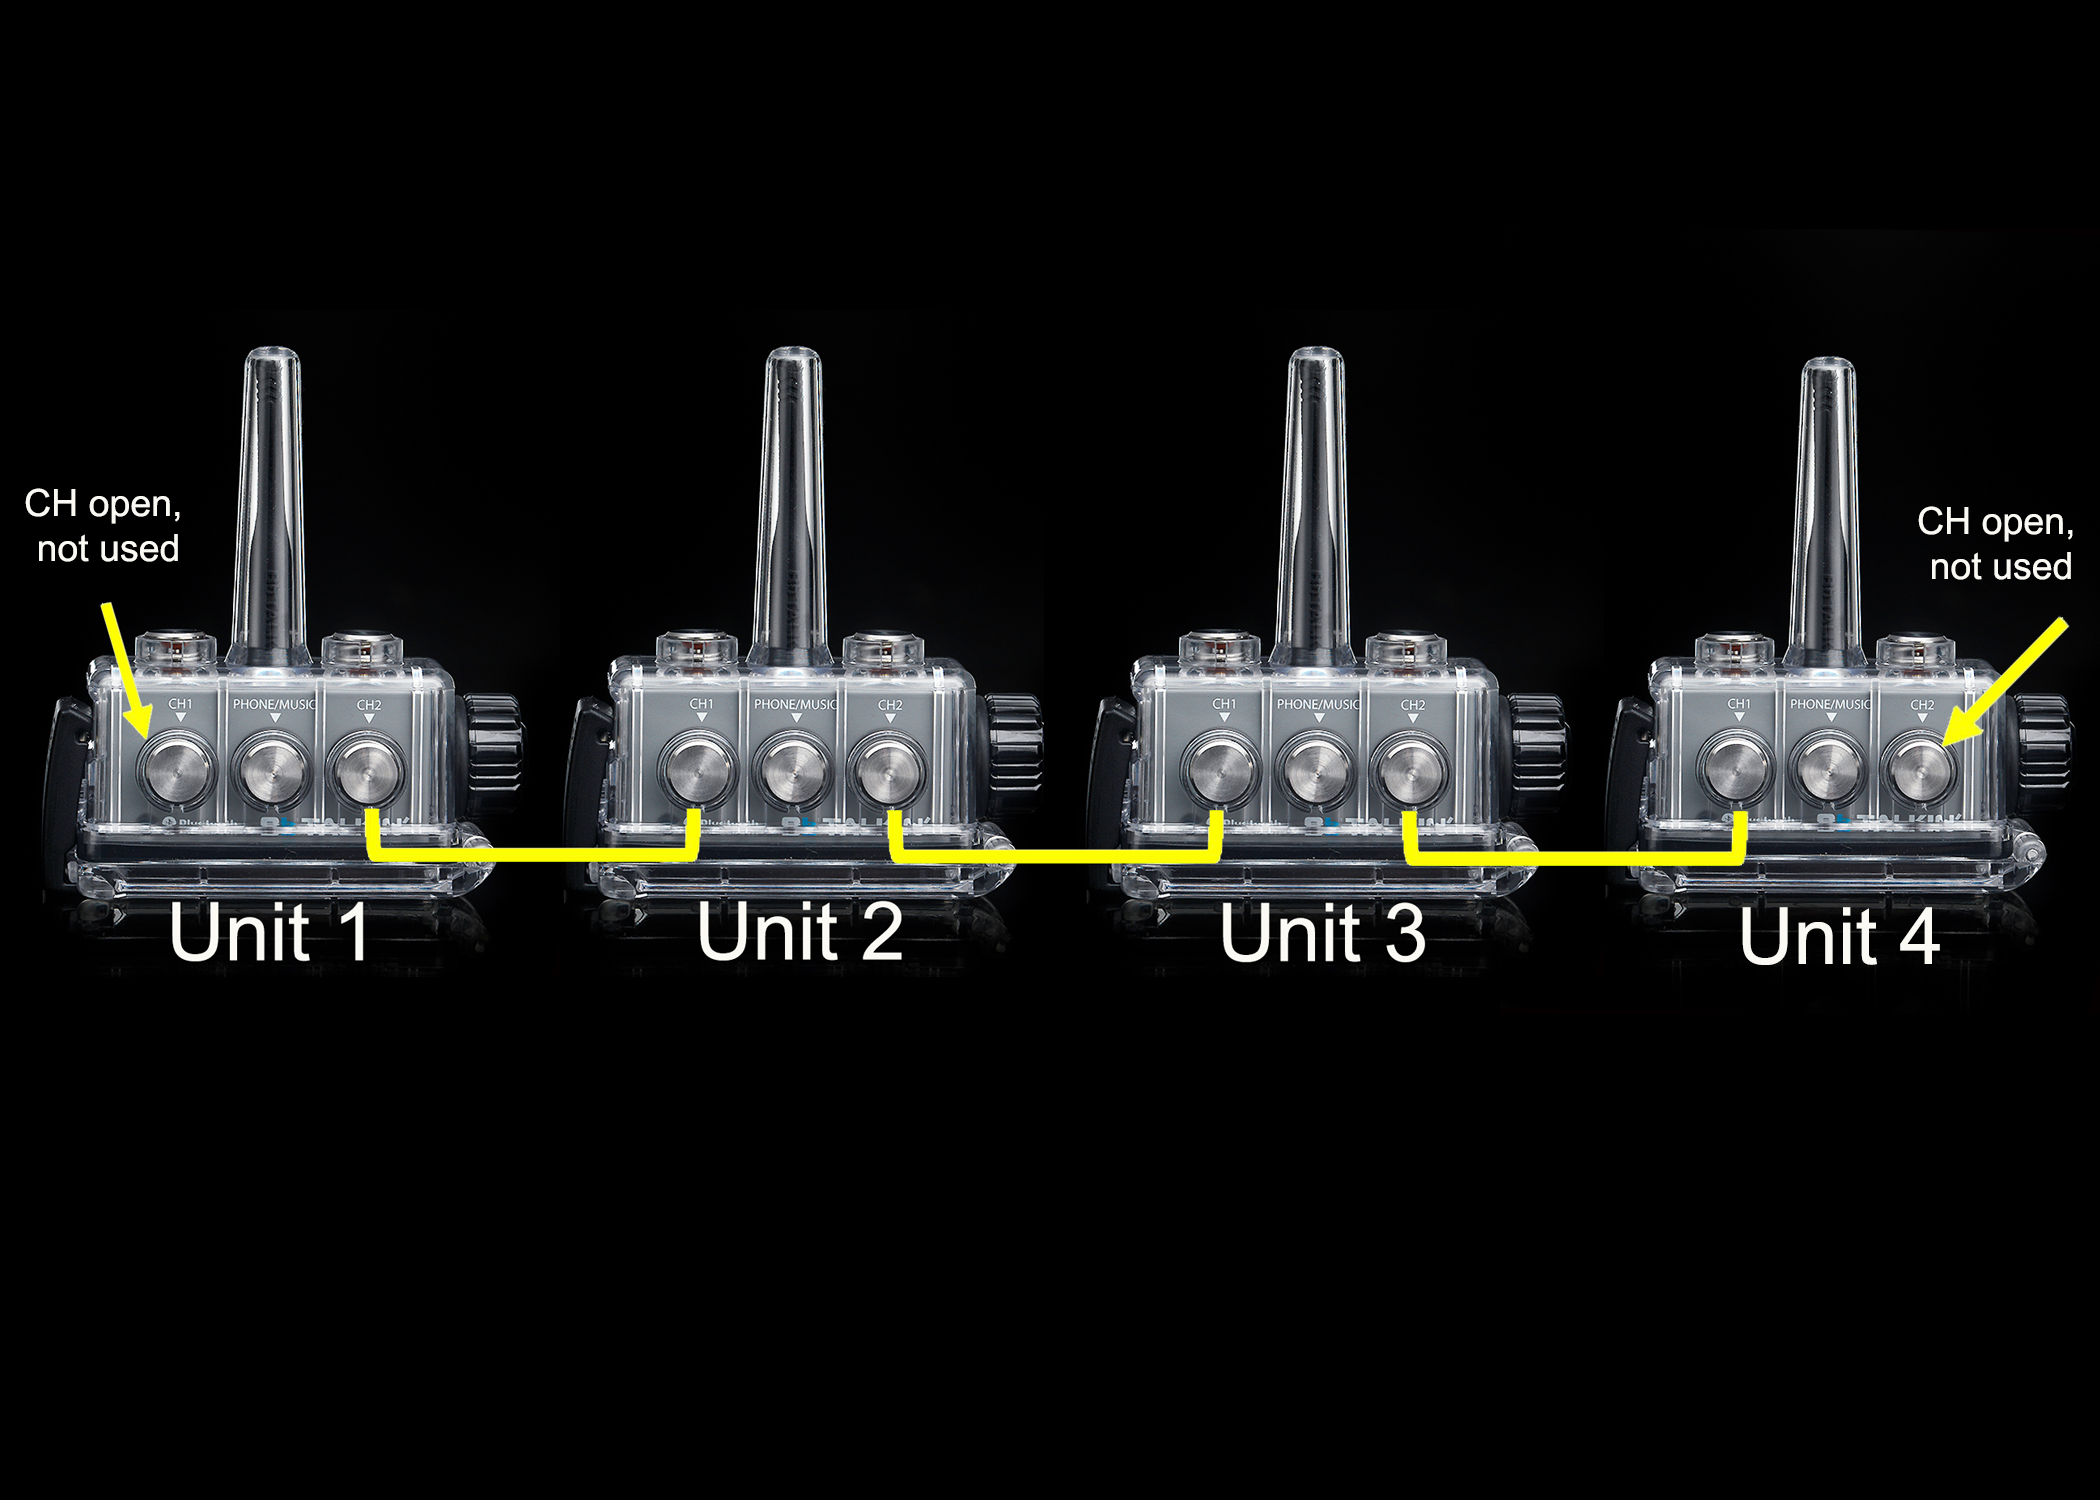
Below displays how your Advance Units connect. Any open channel can be paired to a cell phone. You can also add another unit to your set up on an open channel. You cannot have both a cell phone and unit paired to a channel.
SPECIFICATIONS:
Inter-call talk time: 14 hours
Charge time: 2.5 hours
Weight: 62 g
Range: 1000 meters (2 way communication – line of sight)
Waterproof: IPX 7
*must be in the waterproof case
QUICK REFERENCE GUIDE:
Connect Advance Units
Your units come paired out of the box. Power on and quickly press one of the units CH buttons once. You can press the CH button to connect or disconnect.
Hands-free Headset for Cell Phone
Once connected via Bluetooth to your cell phone you can answer or make phone calls:
- Press PHONE/MUSIC button once to answer or hang up phone call
- Press PHONE/MUSIC button twice quickly to decline call or redial
Only units with an open channel can be connected to a cell phone. For example, if you have 3 units connected, units 1 and 3 can connect to a cell phone but not unit 2.
If one of the units is paired to a phone, all Advance Units connected in that chain will have an open conversation with the person on the phone. Refer to Section C for instructions.
Music Play
Once connected via Bluetooth to your cell phone you can listen to the music on your phone:
- Press PHONE/MUSIC button once to play or pause music
- Press and hold for 2 seconds VOL+ button to forward track
- Press and hold for 2 second VOL- button to play previous track
Music is private. In order to play music, you have to disconnect from another Advance Unit. Only one unit can listen to music.
MP3 or other Bluetooth Players
Our Advance Units will not connect to all Bluetooth devices. We can only guarantee they will connect to a cell phone.
WARNING:
Do NOT modify or disassemble the device.
If your Advance Unit gets damaged, stop using it immediately.
If your Advance Unit gets wet, stop using and immediately turn off. Let it completely dry in a climate controlled area. Do not try to turn your Advance Unit back on until completely dry. If your Advance Unit takes on water, it is most likely damaged beyond repair. Water damage is not covered under warranty.

B. Ready to Use Out of the Box
Your units connect like a chain. When you receive your standard two way set (SKU: A02R), Blue No. 1 and Red No. 2 Channels are already paired together.
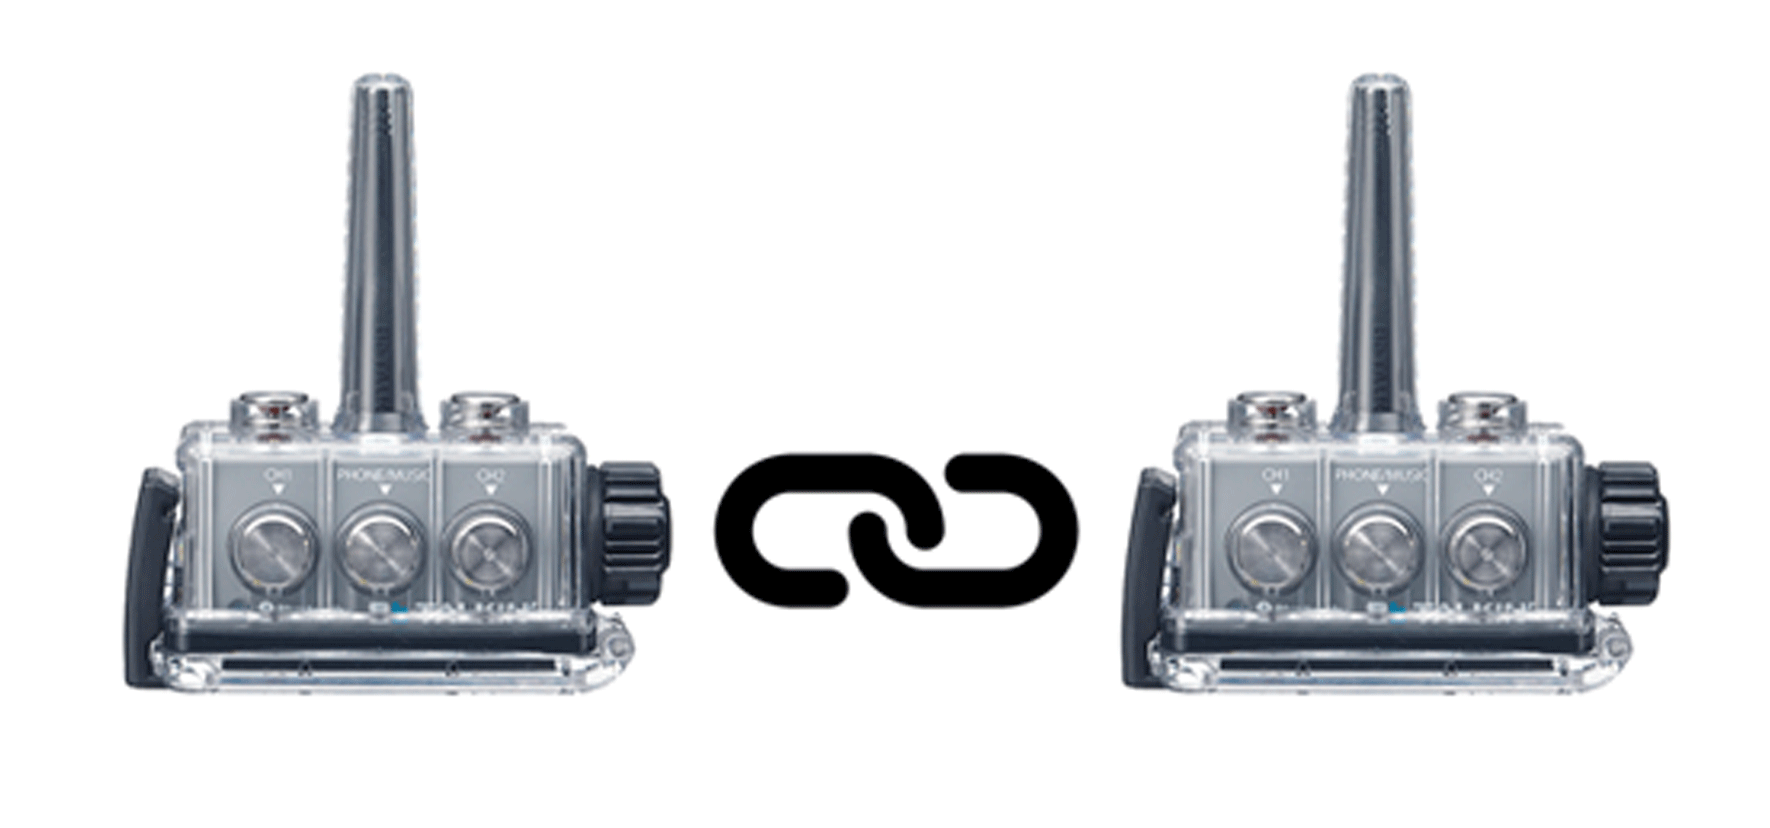

When using your Advance Units, to connect them, the process is quick and simple. You do not need to pair them together. Therefore, you only need to power on the units and press one button to connect them. This process is followed each time you wish to use your units. You only need to pair them if you run into troubles connecting your units or if you want to add a unit to your set up.
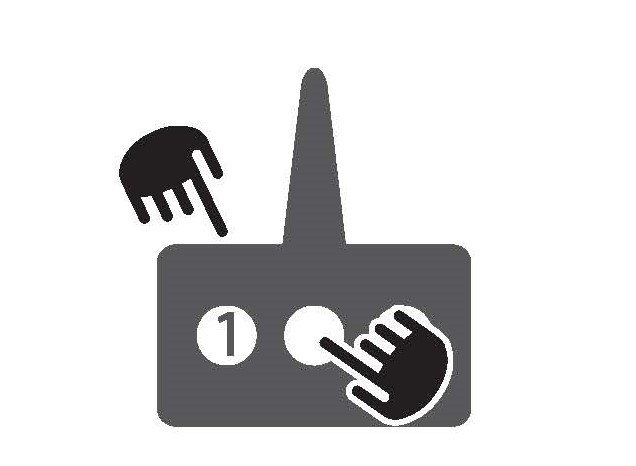
POWER ON
To turn on your Advance Units, press and hold the center button on each unit until the blue light comes on. (3 seconds)
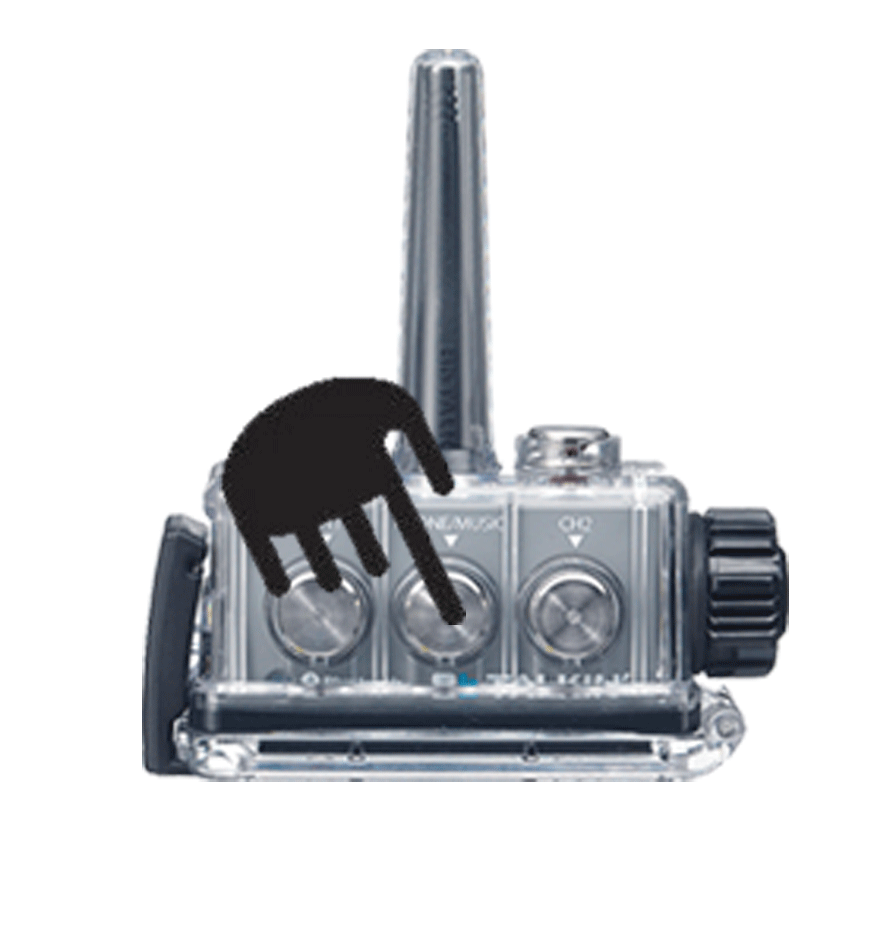
CONNECT
To connect, press the Blue No. 1 or the Red No. 2 button once (0.5 seconds). You only need to press one of the buttons. After pushing either button, wait for both units to announce, “connected.” You can now start to talk.
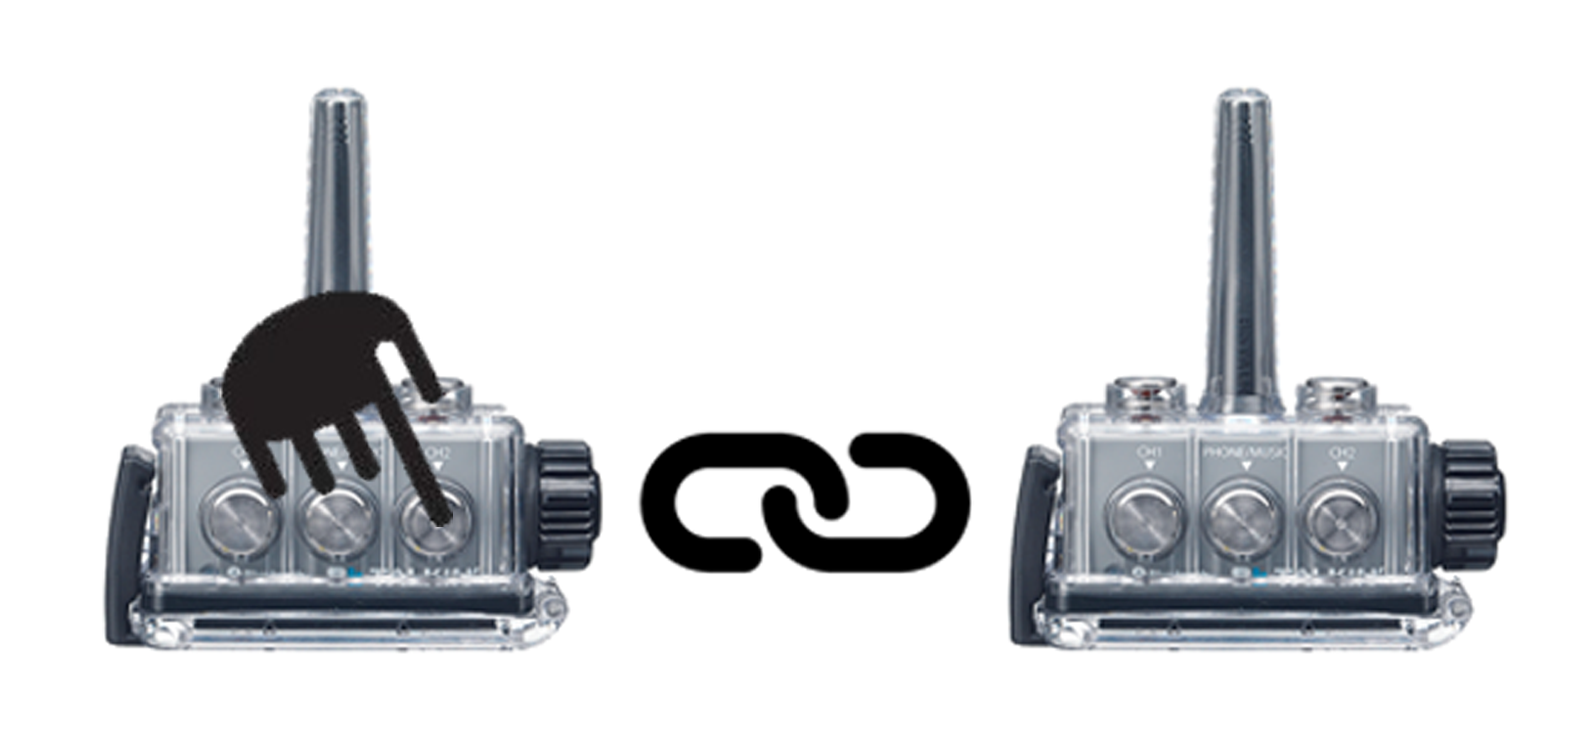
If you wish to dis-connect, it is the same as connecting. Press either the Blue No. 1 or Red No. 2 button once (0.5 seconds).
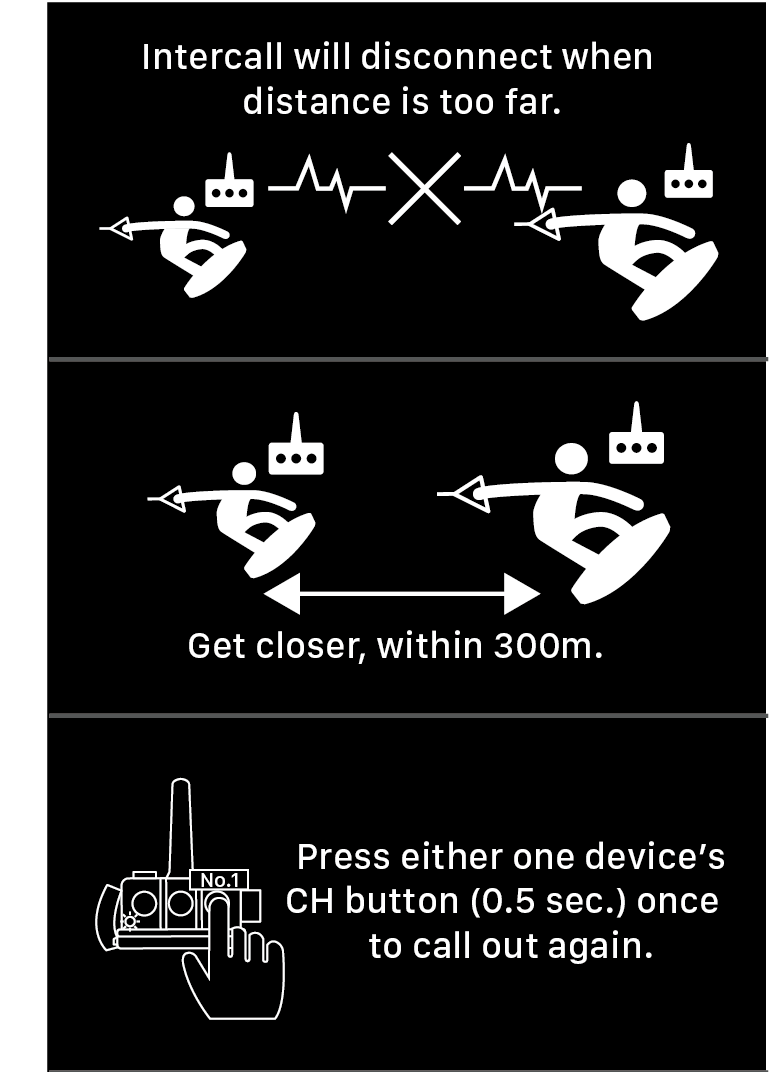
If you go out of range, your Advance Units will disconnect. To re-connect, get within 300 meters and press either the Blue No. 1 or Red No. 2, once the units announce, “connected” you are ready to talk again.
To turn off your Advance Unit, hold the center button until you see a red light. (3 seconds) It is the same button to turn the Advance Unit on or off.
C. Connect to your Phone/Music
*Only units with an open channel can be connected to a cell phone. For example, if you have 3 units connected, units 1 and 3 can connect to a cell phone but not unit 2.
While your Advance Unit is OFF, press and hold the center button until you see the light flashing blue and red.
Go to your smart phone and select BBT-ADV. (Make sure your phone’s Bluetooth is on)

You can now take calls or listen to your music through your Advance Unit.
MUSIC IS PRIVATE. In order to play music, you have to disconnect from another Advance Unit. Only one unit can listen to music.
CALLS ARE OPEN. To accept calls, press the center button once. If you are connected to another Advance Unit, the phone conversation will be open to all parties connect. From your Advance Unit, you can call out to the last number you dialed by pressing the center button twice.
After you have paired your phone with the Advance Unit, that same Advance Unit will automatically pair to your phone when you turn it back on.
PHONE CALL WITH MULTIPLE ADVANCE UNITS
If you have the latest firmware update, you can have up to 4 Advance Units in a phone conference from an outside call. It is important to note that once this is set up, any phone call you receive will be open to all Advance Units on and paired to ADV UNIT #1. (The latest firmware update is BA103.dfu)
STEP 1: Pair ADV UNIT #1 to your smart phone (follow steps above)
STEP 2: Turn on the Advance Units you are going to pair to ADV UNIT #1. Following the pairing process in Section F of this page.

STEP 3: Place the phone call to the smart phone that is paired to your ADV UNIT #1.
If you are going to use multiple Advance units, remember that Advance Unit #1 which is paired to the smart phone must remain close to the smart phone. Advance Unit #2, #3 or #4 can be far away.
NOTE: Next time you turn on the same Advance Unit and the same smart phone, they will automatically pair to all units that are on, as long as the Bluetooth is enabled. You cannot have a cell phone and Advance Unit paired to the same channel.
D. How to Mute
To mute, both Advance Units need to be powered on and connected to one another.
Press the volume up (+) and volume down (-) buttons at the same time on your Advance Unit.
You will see the blue light flash quickly on the unit, indicating this unit is on mute.
To cancel mute, follow the same process.
E. How to ReSet
While OFF, press and hold the Phone/Music and Volume + button at the same time until the purple LED comes on.
F. How to Pair your Advance Units back together if you become Un-Paired/
Add Advance Unit(s) to your Existing Communication Set Up
If your Advance Units become unpaired or you wish to add an Advance Unit to your existing communication set up, follow the steps below.
You only have to follow these steps if your units become un-paired. When you receive your 2-way communication package, the units come already paired.
Step 1: ReSet all units
Follow the ReSet Instructions from the section above.
Step 2: Turn on all devices
Press and hold the center button (phone/music) until LED is on.

Step 3: Pair Advance Unit 1 and 2
Press and hold Advance Unit #1’s CH2 button and Advance Unit #2’s CH1 button until red LED light flashes.

Press Advance Unit #1’s CH2 button once. (You can also press Advance Unit #2’s CH1 button once .) It does not matter which button you press to connect, you just press one of the unit’s channel buttons once.
Let the units find each other. Once paired, you will see both units’ blue LED light flashing. (If you have a head accessory connected during this process, you will hear “connected” once successfully paired.)
Step 4: Pair Advance Unit 2 and 3
When you are connecting more than two units, the units are paired like a chain: 1 to 2, 2 to 3, 3 to 4.
Press and hold Advance Unit #2’s CH2 button and Advance Unit #3’s CH1 button until red LED light flashes.
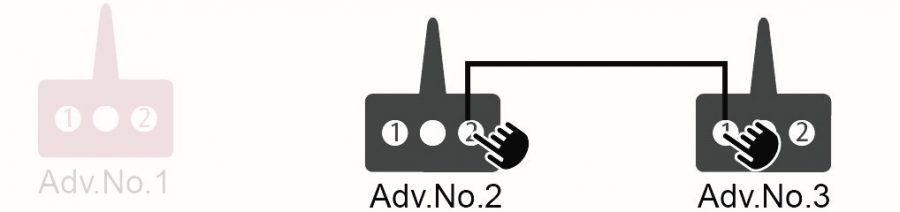
Press Advance Unit #2’s CH2 button once. (You can also press Advance Unit #3’s CH1 button once .) It does not matter which button you press to connect, you just press one of the unit’s channel buttons once.
Let the units find each other. Once paired, you will see both units’ blue LED light flashing. (If you have a head accessory connected during this process, you will hear “connected” once successfully paired.)
Step 5: Pair Advance Unit 3 and 4
Press and hold Advance Unit #3’s CH2 button and Advance Unit #4’s CH1 button until red LED light flashes.

Press Advance Unit #3’s CH2 button once. (You can also press Advance Unit #4’s CH1 button once .) It does not matter which button you press to connect, you just press one of the unit’s channel buttons once.
Let the units find each other. Once paired, you will see both units’ blue LED light flashing. (If you have a head accessory connected during this process, you will hear “connected” once successfully paired.)